Build AI-Assisted blog with AdminForth and Nuxt in 20 minutes

Many developers today are using copilots to write code faster and relax their minds from a routine tasks.
But what about writing plain text? For example blogs and micro-blogs: sometimes you want to share your progress but you are lazy for typing. Then you can give a try to AI-assisted blogging. Our Open-Source AdminForth framework has couple of new AI-capable plugins to write text and generate images.
For AI plugins are backed by OpenAI API, but their architecture allows to be easily extended for other AI providers once OpenAI competitors will reach the same or better level of quality.
Here we will suggest you simple as 1-2-3 steps to build and host a blog with AI assistant which will help you to write posts.
Our tech stack will include:
- Nuxt.js - SEO-friendly page rendering framework
- AdminForth - Admin panel framework for creating posts
- AdminForth RichEditor plugin - WYSIWYG editor with AI assistant in Copilot style
- Node and typescript
- Prisma for migrations
- SQLite for database, though you can easily switch it to Postgres or MongoDB
Prerequirements
We will use Node v20, if you not have it installed, we recommend NVM
nvm install 20
nvm alias default 20
nvm use 20
Step 1: Create a new AdminForth project
npx adminforth create-app --app-name ai-blog
Add modules:
cd ai-blog
npm i @adminforth/upload @adminforth/rich-editor @adminforth/text-complete @adminforth/chat-gpt slugify http-proxy @adminforth/image-generation-adapter-openai @adminforth/completion-adapter-open-ai-chat-gpt
Step 2: Prepare environment
OpenAI
To allocate OpenAI API key, go to https://platform.openai.com/, open Dashboard -> API keys -> Create new secret key.
S3
- Go to https://aws.amazon.com and login.
- Go to Services -> S3 and create a bucket. Put in bucket name e.g.
my-ai-blog-bucket. First of all go to your bucket settings, Permissions, scroll down to Block public access (bucket settings for this bucket) and uncheck all checkboxes. Go to bucket settings, Permissions, Object ownership and select "ACLs Enabled" and "Bucket owner preferred" radio buttons. - Go to bucket settings, Permissions, scroll down to Cross-origin resource sharing (CORS) and put in the following configuration:
[
    {
        "AllowedHeaders": [
            "*"
        ],
        "AllowedMethods": [
            "HEAD",
            "PUT"
        ],
        "AllowedOrigins": [
            "http://localhost:3500"
        ],
        "ExposeHeaders": []
    }
]
☝️ In AllowedOrigins add all your domains. For example if you will serve blog and admin on
https://blog.example.com/you should add"https://blog.example.com"to AllowedOrigins:[
"https://blog.example.com",
"http://localhost:3500"
]Every character matters, so don't forget to add
http://orhttps://and don't add slashes at the end of the domain.
- Go to Services -> IAM and create a new user. Put in user name e.g.
my-ai-blog-bucket. - Attach existing policies directly ->
AmazonS3FullAccess. Go to your user ->Add permissions->Attach policies directly->AmazonS3FullAccess - Go to Security credentials and create a new access key. Save
Access key IDandSecret access key.
Edit .env file in project directory
Create .env file with the following content:
OPENAI_API_KEY=...
AWS_ACCESS_KEY_ID=your_access_key_id
AWS_SECRET_ACCESS_KEY=your_secret_access_key
Edit .env.local file and add:
AWS_S3_BUCKET=my-ai-blog-bucket
AWS_S3_REGION=us-east-1
In same way edit .env.prod file and add:
AWS_S3_BUCKET=my-ai-blog-bucket
AWS_S3_REGION=us-east-1
Step 3: Add prisma models
Open ./schema.prisma and put next content there:
generator client {
  provider = "prisma-client-js"
}

datasource db {
  provider = "sqlite"
  url      = env("PRISMA_DATABASE_URL")
}

model adminuser {
  id            String     @id
  email         String     @unique
  password_hash String
  role          String
  created_at    DateTime
  avatar       String?
  public_name  String?
  posts        Post[]
}

model Post {
  id          String     @id
  createdAt   DateTime
  title       String
  slug        String
  picture     String?
  content     String
  published   Boolean
  author      adminuser?    @relation(fields: [authorId], references: [id])
  authorId    String?
  contentImages ContentImage[]
}

model ContentImage {
  id         String     @id
  createdAt  DateTime
  img        String
  postId     String
  resourceId String
  post       Post      @relation(fields: [postId], references: [id])
}
Create a migration:
npm run makemigration -- --name add-posts ; npm run migrate:local
Step 4: Setting up AdminForth
Open index.ts file in root directory and update it with the following content:
import express from 'express';
import AdminForth, { Filters, Sorts, logger } from 'adminforth';
import userResource from './resources/adminuser.js';
import postResource from './resources/posts.js';
import contentImageResource from './resources/content-image.js';
import httpProxy from 'http-proxy';

declare var process : {
  env: {
    DATABASE_URL: string
    NODE_ENV: string,
    AWS_S3_BUCKET: string,
    AWS_S3_REGION: string,
  }
  argv: string[]
}

export const admin = new AdminForth({
  baseUrl: '/admin',
  auth: {
    usersResourceId: 'adminuser',  // resource to get user during login
    usernameField: 'email',  // field where username is stored, should exist in resource
    passwordHashField: 'password_hash',
  },
  customization: {
    brandName: 'My Admin',
    datesFormat: 'D MMM',
    timeFormat: 'HH:mm',
    emptyFieldPlaceholder: '-',
    styles: {
      colors: {
        light: {
          // color for links, icons etc.
          primary: 'rgb(47 37 227)',
          // color for sidebar and text
          sidebar: {main:'#EFF5F7', text:'#333'},
        },
      }
    }
  },
  dataSources: [{
    id: 'maindb',
    url:  process.env.DATABASE_URL?.replace('file:', 'sqlite://'),
  }],
  resources: [
    userResource,
    postResource,
    contentImageResource,
  ],
  menu: [
    {
      homepage: true,
      label: 'Posts',
      icon: 'flowbite:home-solid',
      resourceId: 'post',
    },
    { type: 'gap' },
    { type: 'divider' },
    { type: 'heading', label: 'SYSTEM' },
    {
      label: 'Users',
      icon: 'flowbite:user-solid',
      resourceId: 'adminuser',
    }
  ],
});


if (import.meta.url === `file://${process.argv[1]}`) {
  // if script is executed directly e.g. node index.ts or npm start

  const app = express()
  app.use(express.json());
  const port = 3500;

  admin.bundleNow({ hotReload: process.env.NODE_ENV === 'development' }).then(() => {
    logger.info('Bundling AdminForth SPA done.');
  });

  // api to server recent posts
  app.get('/api/posts', async (req, res) => {
    const offset = parseInt(req.query.offset as string) || 0;
    const limit = parseInt(req.query.limit as string) || 100;
    const slug = req.query.slug as string | null;
    const posts = await admin.resource('post').list(
      [Filters.EQ('published', true), ...(slug ? [Filters.LIKE('slug', slug)] : [])],
      limit,
      offset,
      Sorts.DESC('createdAt'),
    );
    const authorIds = [...new Set(posts.map((p: any) => p.authorId))];
    const authors = (await admin.resource('adminuser').list(Filters.IN('id', authorIds)))
      .reduce((acc: any, a: any) => {acc[a.id] = a; return acc;}, {});
    posts.forEach((p: any) => {
      const author = authors[p.authorId];
      p.author = {
        publicName: author.publicName,
        avatar: `https://${process.env.AWS_S3_BUCKET}.s3.${process.env.AWS_S3_REGION}.amazonaws.com/${author.avatar}`
      };
      p.picture = `https://${process.env.AWS_S3_BUCKET}.s3.${process.env.AWS_S3_REGION}.amazonaws.com/${p.picture}`;
    });
    res.json(posts);
  });

  // here we proxy all non-/admin requests to nuxt instance http://localhost:3000
  // this is done for demo purposes, in production you should do this using high-performance reverse proxy like traefik or nginx
  app.use((req, res, next) => {
    if (!req.url.startsWith('/admin')) {
      const proxy = httpProxy.createProxyServer();
      proxy.on('error', function (err, req, res) {
        res.send(`No response from Nuxt at http://localhost:3000, did you start it? ${err}`)
      });
      proxy.web(req, res, { target: 'http://localhost:3000' });
    } else {
      next();
    }
  });

  // serve after you added all api
  admin.express.serve(app)

  admin.discoverDatabases().then(async () => {
    if (!await admin.resource('adminuser').get([Filters.EQ('email', 'adminforth@adminforth.dev')])) {
      await admin.resource('adminuser').create({
        email: 'adminforth@adminforth.dev',
        role: 'superadmin',
        password_hash: await AdminForth.Utils.generatePasswordHash('adminforth'),
      });
    }
  });

  admin.express.listen(port, () => {
    logger.info(`\n⚡ AdminForth is available at http://localhost:${port}/admin\n`)
  });
}
Step 5: Edit resources
Open ./resources/adminuser.ts file with following content:
import AdminForth, { AdminForthDataTypes } from 'adminforth';
import { randomUUID } from 'crypto';
import UploadPlugin from '@adminforth/upload';

export default {
  dataSource: 'maindb',
  table: 'adminuser',
  label: 'Users',
  recordLabel: (r: any) => `👤 ${r.email}`,
  columns: [
    {
      name: 'id',
      primaryKey: true,
      fillOnCreate: () => randomUUID(),
      showIn: {
        edit: false,
        create: false,
      },
    },
    {
      name: 'email',
      required: true,
      isUnique: true,
      enforceLowerCase: true,
      validation: [
        AdminForth.Utils.EMAIL_VALIDATOR,
      ],
      type: AdminForthDataTypes.STRING,
    },
    {
      name: 'role',
      enum: [
        { value: 'superadmin', label: 'Super Admin' },
        { value: 'user', label: 'User' },
      ]
    },
    {
      name: 'created_at',
      type: AdminForthDataTypes.DATETIME,
      showIn: {
        edit: false,
        create: false,
      },
      fillOnCreate: () => (new Date()).toISOString(),
    },
    {
      name: 'password',
      virtual: true,
      required: { create: true },
      editingNote: { edit: 'Leave empty to keep password unchanged' },
      minLength: 8,
      type: AdminForthDataTypes.STRING,
      showIn: {
        show: false,
        list: false,
        filter: false,
      },
      masked: true,
      validation: [
        // request to have at least 1 digit, 1 upper case, 1 lower case
        AdminForth.Utils.PASSWORD_VALIDATORS.UP_LOW_NUM,
      ],
    },
    { name: 'password_hash', backendOnly: true, showIn: { all: false } },
    {
      name: 'public_name',
      type: AdminForthDataTypes.STRING,
    },
    { name: 'avatar' },
  ],
  hooks: {
    create: {
      beforeSave: async ({ record, adminUser, resource }) => {
        record.passwordHash = await AdminForth.Utils.generatePasswordHash(record.password);
        return { ok: true };
      }
    },
    edit: {
      beforeSave: async ({ record, adminUser, resource }) => {
        if (record.password) {
          record.passwordHash = await AdminForth.Utils.generatePasswordHash(record.password);
        }
        return { ok: true }
      },
    },
  },
  plugins: [
    new UploadPlugin({
      pathColumnName: 'avatar',
      s3Bucket: process.env.AWS_S3_BUCKET,
      s3Region: process.env.AWS_S3_REGION,
      allowedFileExtensions: ['jpg', 'jpeg', 'png', 'gif', 'webm','webp'],
      maxFileSize: 1024 * 1024 * 20, // 20MB
      s3AccessKeyId: process.env.AWS_ACCESS_KEY_ID,
      s3SecretAccessKey: process.env.AWS_SECRET_ACCESS_KEY,
      s3ACL: 'public-read', // ACL which will be set to uploaded file
      s3Path: (
        { originalFilename, originalExtension }: {originalFilename: string, originalExtension: string }
      ) => `user-avatars/${new Date().getFullYear()}/${randomUUID()}/${originalFilename}.${originalExtension}`,
      generation: {
        provider: 'openai',
        countToGenerate: 2,
        openAiOptions: {
          model: 'gpt-4o',
          apiKey: process.env.OPENAI_API_KEY,
        },
      },
    }),
  ],
}
Create posts.ts file in res directory with following content:
import { AdminUser, AdminForthDataTypes } from 'adminforth';
import { randomUUID } from 'crypto';
import UploadPlugin from '@adminforth/upload';
import RichEditorPlugin from '@adminforth/rich-editor';
import ChatGptPlugin from '@adminforth/chat-gpt';
import slugify from 'slugify';
import CompletionAdapterOpenAIChatGPT from "@adminforth/completion-adapter-open-ai-chat-gpt";
import ImageGenerationAdapterOpenAI from '@adminforth/image-generation-adapter-openai';

export default {
  table: 'post',
  dataSource: 'maindb',
  label: 'Posts',
  recordLabel: (r: any) => `📝 ${r.title}`,
  columns: [
    {
      name: 'id',
      primaryKey: true,
      fillOnCreate: () => randomUUID(),
      showIn: {
        list: false,
        edit: false,
        create: false,
      },
    },
    {
      name: 'title',
      required: true,
      showIn: { all: true },
      maxLength: 255,
      minLength: 3,
      type: AdminForthDataTypes.STRING,
    },
    {
      name: 'picture',
      showIn: { all: true },
    },
    {
      name: 'slug',
      showIn: {
        list: false,
        edit: false,
        create: false,
      },
    },
    {
      name: 'content',
      showIn: { list: false },
      type: AdminForthDataTypes.TEXT,
      components: {
        show: "@/renderers/RichText.vue",
      }
    },
    {
      name: 'createdAt',
      showIn: {
        edit: false,
        create: false,
      },
      fillOnCreate: () => (new Date()).toISOString(),
    },
    {
      name: 'published',
      required: true,
    },
    {
      name: 'authorId',
      foreignResource: {
        resourceId: 'adminuser',
      },
      showIn: {
        list: false,
        edit: false,
        create: false,
      },
      fillOnCreate: ({ adminUser }: { adminUser: AdminUser }) => {
        return adminUser.dbUser.id;
      }
    }
  ],
  hooks: {
    create: {
      beforeSave: async ({ record, adminUser }: { record: any, adminUser: AdminUser }) => {
        record.slug = slugify(record.title, { lower: true });
        return { ok: true };
      },
    },
    edit: {
      beforeSave: async ({ record, adminUser }: { record: any, adminUser: AdminUser }) => {
        if (record.title) {
          record.slug = slugify(record.title, { lower: true });
        }
        return { ok: true };
      },
    },
  },
  plugins: [
    new UploadPlugin({
      pathColumnName: 'picture',
      s3Bucket: process.env.AWS_S3_BUCKET,
      s3Region: process.env.AWS_S3_REGION,
      allowedFileExtensions: ['jpg', 'jpeg', 'png', 'gif', 'webm','webp'],
      maxFileSize: 1024 * 1024 * 20, // 20MB
      s3AccessKeyId: process.env.AWS_ACCESS_KEY_ID,
      s3SecretAccessKey: process.env.AWS_SECRET_ACCESS_KEY,
      s3ACL: 'public-read', // ACL which will be set to uploaded file
      s3Path: (
        { originalFilename, originalExtension }: {originalFilename: string, originalExtension: string }
      ) => `post-previews/${new Date().getFullYear()}/${randomUUID()}/${originalFilename}.${originalExtension}`,
      generation: {
        countToGenerate: 2,
        adapter: new ImageGenerationAdapterOpenAI({
          openAiApiKey: process.env.OPENAI_API_KEY as string,
          model: 'gpt-image-1',
        }),
        fieldsForContext: ['title'],
        outputSize: '1536x1024'
      },
    }),
    new RichEditorPlugin({
      htmlFieldName: 'content',
      completion: {
        adapter: new CompletionAdapterOpenAIChatGPT({
          openAiApiKey: process.env.OPENAI_API_KEY as string,
          model: 'gpt-4o',
          expert: {
            temperature: 0.7
          }
        }),
        expert: {
          debounceTime: 250,
        }
      },
      attachments: {
        attachmentResource: 'contentImage',
        attachmentFieldName: 'img',
        attachmentRecordIdFieldName: 'postId',
        attachmentResourceIdFieldName: 'resourceId',
      },
    }),
    new ChatGptPlugin({
      openAiApiKey: process.env.OPENAI_API_KEY,
      model: 'gpt-4o',
      fieldName: 'title',
      expert: {
        debounceTime: 250,
      }
    }),
  ]
}
Also create content-image.ts file in res directory with following content:
import { AdminForthDataTypes } from 'adminforth';
import { randomUUID } from 'crypto';
import UploadPlugin from '@adminforth/upload';

export default {
  table: 'contentImage',
  dataSource: 'maindb',
  label: 'Content Images',
  recordLabel: (r: any) => `🖼️ ${r.img}`,
  columns: [
    {
      name: 'id',
      primaryKey: true,
      showIn: {
        edit: false,
        create: false,
      },
      fillOnCreate: () => randomUUID(),
    },
    {
      name: 'createdAt',
      type: AdminForthDataTypes.DATETIME,
      showIn: {
        edit: false,
        create: false,
      },
      fillOnCreate: () => (new Date()).toISOString(),
    },
    {
      name: 'img',
      type: AdminForthDataTypes.STRING,
      required: true,
    },
    {
      name: 'postId',
      foreignResource: {
        resourceId: 'post',
      },
      showIn: {
        edit: false,
        create: false,
      },
    },
    {
      name: 'resourceId',
    }
  ],
  plugins: [
    new UploadPlugin({
      pathColumnName: 'img',
      s3Bucket: process.env.AWS_S3_BUCKET,
      s3Region: process.env.AWS_S3_REGION,
      allowedFileExtensions: ['jpg', 'jpeg', 'png', 'gif', 'webm','webp'],
      maxFileSize: 1024 * 1024 * 20, // 20MB
      s3AccessKeyId: process.env.AWS_ACCESS_KEY_ID,
      s3SecretAccessKey: process.env.AWS_SECRET_ACCESS_KEY,
      s3ACL: 'public-read', // ACL which will be set to uploaded file
      s3Path: (
        { originalFilename, originalExtension }: {originalFilename: string, originalExtension: string }
      ) => `post-content/${new Date().getFullYear()}/${randomUUID()}/${originalFilename}.${originalExtension}`,
    }),
  ],
}
Now you can start your admin panel:
npm run dev
Open http://localhost:3500/admin in your browser and login with adminforth@adminforth.dev and adminforth credentials.
Set up your avatar (you can generate it with AI) and public name in user settings.
Step 6: Create Nuxt project
Now let's initialize our seo-facing frontend.
In the root directory of your admin app (ai-blog) and create a new folder seo and run:
npx nuxi@latest init seo
cd seo
npm install -D sass-embedded
npm run dev
Edit app.vue:
<template>
  <div id="app">
    <NuxtPage />
  </div>
</template>


<style lang="scss">

$grColor1: #74E1FF;
$grColor2: #8580B4;
$grColor3: #5E53C3;
$grColor4: #4FC7E9;
$grColor5: #695BE9;

  #app {
    font-family: Avenir, Helvetica, Arial, sans-serif;
    -webkit-font-smoothing: antialiased;
    -moz-osx-font-smoothing: grayscale;
    // gradient with color spots
    animation: gradient 15s ease infinite;
    min-height: 100dvh;
  }
  body {
    margin: 0;
    padding: 0;
    max-height: 100dvh;
    overflow: overlay;
    background-image: radial-gradient(
  circle farthest-corner at top left, $grColor1 0%, rgba(225, 243, 97,0) 50%),
      radial-gradient(
      circle farthest-side at top right, $grColor2 0%, rgba(181, 176, 177,0) 10%),
      radial-gradient(circle farthest-corner at bottom right, $grColor3 0%, rgba(204, 104, 119, 0) 33%),
      radial-gradient(
          circle farthest-corner at top right, $grColor4 0%, rgba(155, 221, 240,0) 50%),
      radial-gradient(ellipse at bottom center, $grColor5 0%, rgba(254, 43, 0, 0) 80%);
    background-attachment: fixed;
  }
</style>
Add folder pages and create index.vue:
<template>
  <div class="container">
    <PostCard
      v-for="post in posts"
      :key="post.id"
      :post="post"
    />
    <div class="no-posts" v-if="!posts.length">
      No posts added yet
      <a href="/admin">Add a first one in admin</a>
    </div>
  </div>
</template>

<style lang="scss">
.container {
  display: flex;
  justify-content: center;
  align-items: center;
  flex-wrap: wrap;
  flex-direction: column;
  gap: 1rem;
  padding-top: 2rem;
}

.no-posts {
  margin-top: 2rem;
  font-size: 1.5rem;
  text-align: center;
  background-color: rgba(255 244 255 / 0.43);
  padding: 2rem;
  border-radius: 0.5rem;
  border: 1px solid #FFFFFF;
  box-shadow: 0.2rem 0.3rem 2rem rgba(0, 0, 0, 0.1);
  color: #555;
  a {
    color: #333;
    text-decoration: underline;
    margin-top: 1rem;
    display: block;
    font-size: 1.2rem;
  }

}
</style>

<script lang="ts" setup>

import PostCard from '~/PostCard.vue'

const posts = ref([])

onMounted(async () => {
  const resp = await fetch(`/api/posts`);
  posts.value = await resp.json();
})

</script>
Finally, create PostCard.vue component:
<template>
  <div class="post-card">
    <img v-if="props.post.picture" :src="props.post.picture" alt="post image" />
    <h2>{{ props.post.title }}</h2>
    <div class="content" v-html="props.post.content"></div>
    <div class="posted-at">
      <div>{{ formatDate(props.post.createdAt) }}</div>
      <div class="author">
        <img :src="props.post.author.avatar" alt="author avatar" />
        <div>
          {{ props.post.author.publicName }}
        </div>
      </div>
    </div>
  </div>
</template>

<script setup lang="ts">

const props = defineProps<{
  post: {
    title: string
    content: string
    createdAt: string // iso date
    picture?: string
    author: {
      publicName: string
      avatar: string
    }
  }
}>()


function formatDate(date: string) {
  // format to format MMM DD, YYYY using Intl.DateTimeFormat
  return new Intl.DateTimeFormat('en-US', {
    month: 'short',
    day: '2-digit',
    year: 'numeric'
  }).format(new Date(date))
}
</script>

<style lang="scss">

.post-card {
  background-color: rgba(255 244 255 / 0.43);
  padding: 2rem;
  border-radius: 0.5rem;
  border: 1px solid #FFFFFF;
  box-shadow: 0.2rem 0.3rem 2rem rgba(0, 0, 0, 0.1);
  max-width: calc(100vw - 4rem);
  width: 600px;
  color: #333;
  line-height: 1.8rem;

  >img {
    width: 100%;
    border-radius: 0.5rem;
    margin-bottom: 2rem;
  }

  h2 {
    margin: 0 0 2rem 0;
    font-size: 1.5rem;
  }

  .content {
    margin-top: 1rem;
  }

  .posted-at {
    margin-top: 1rem;
    font-size: 0.8rem;
    color: #666;
    display: flex;
    justify-content: space-between;
    align-items: center;
  }

  .author {
    display: flex;
    align-items: center;

    img {
      width: 2rem;
      height: 2rem;
      border-radius: 50%;
      margin-right: 0.5rem;
    }
    div {
      // flash wire dot line effect
      position: relative;
      overflow: hidden;
      border-radius: 1rem;
      padding: 0.2rem 0.5rem;
      font-size: 1rem;
      background: linear-gradient(90deg, rgb(0 21 255) 0%, rgb(0 0 0) 100%);
      background-size: 200% auto;
      background-clip: text;
      -webkit-background-clip: text;
      color: transparent; /* Hide the original text color */
      animation: shimmer 2s infinite;
      @keyframes shimmer {
        0% {
          background-position: -200% center;
        }
        100% {
          background-position: 200% center;
        }
      }

    }
  }

}

</style>
Now you can start your Nuxt project:
npm run dev
And run npm start if you did not run it previously:
npm start
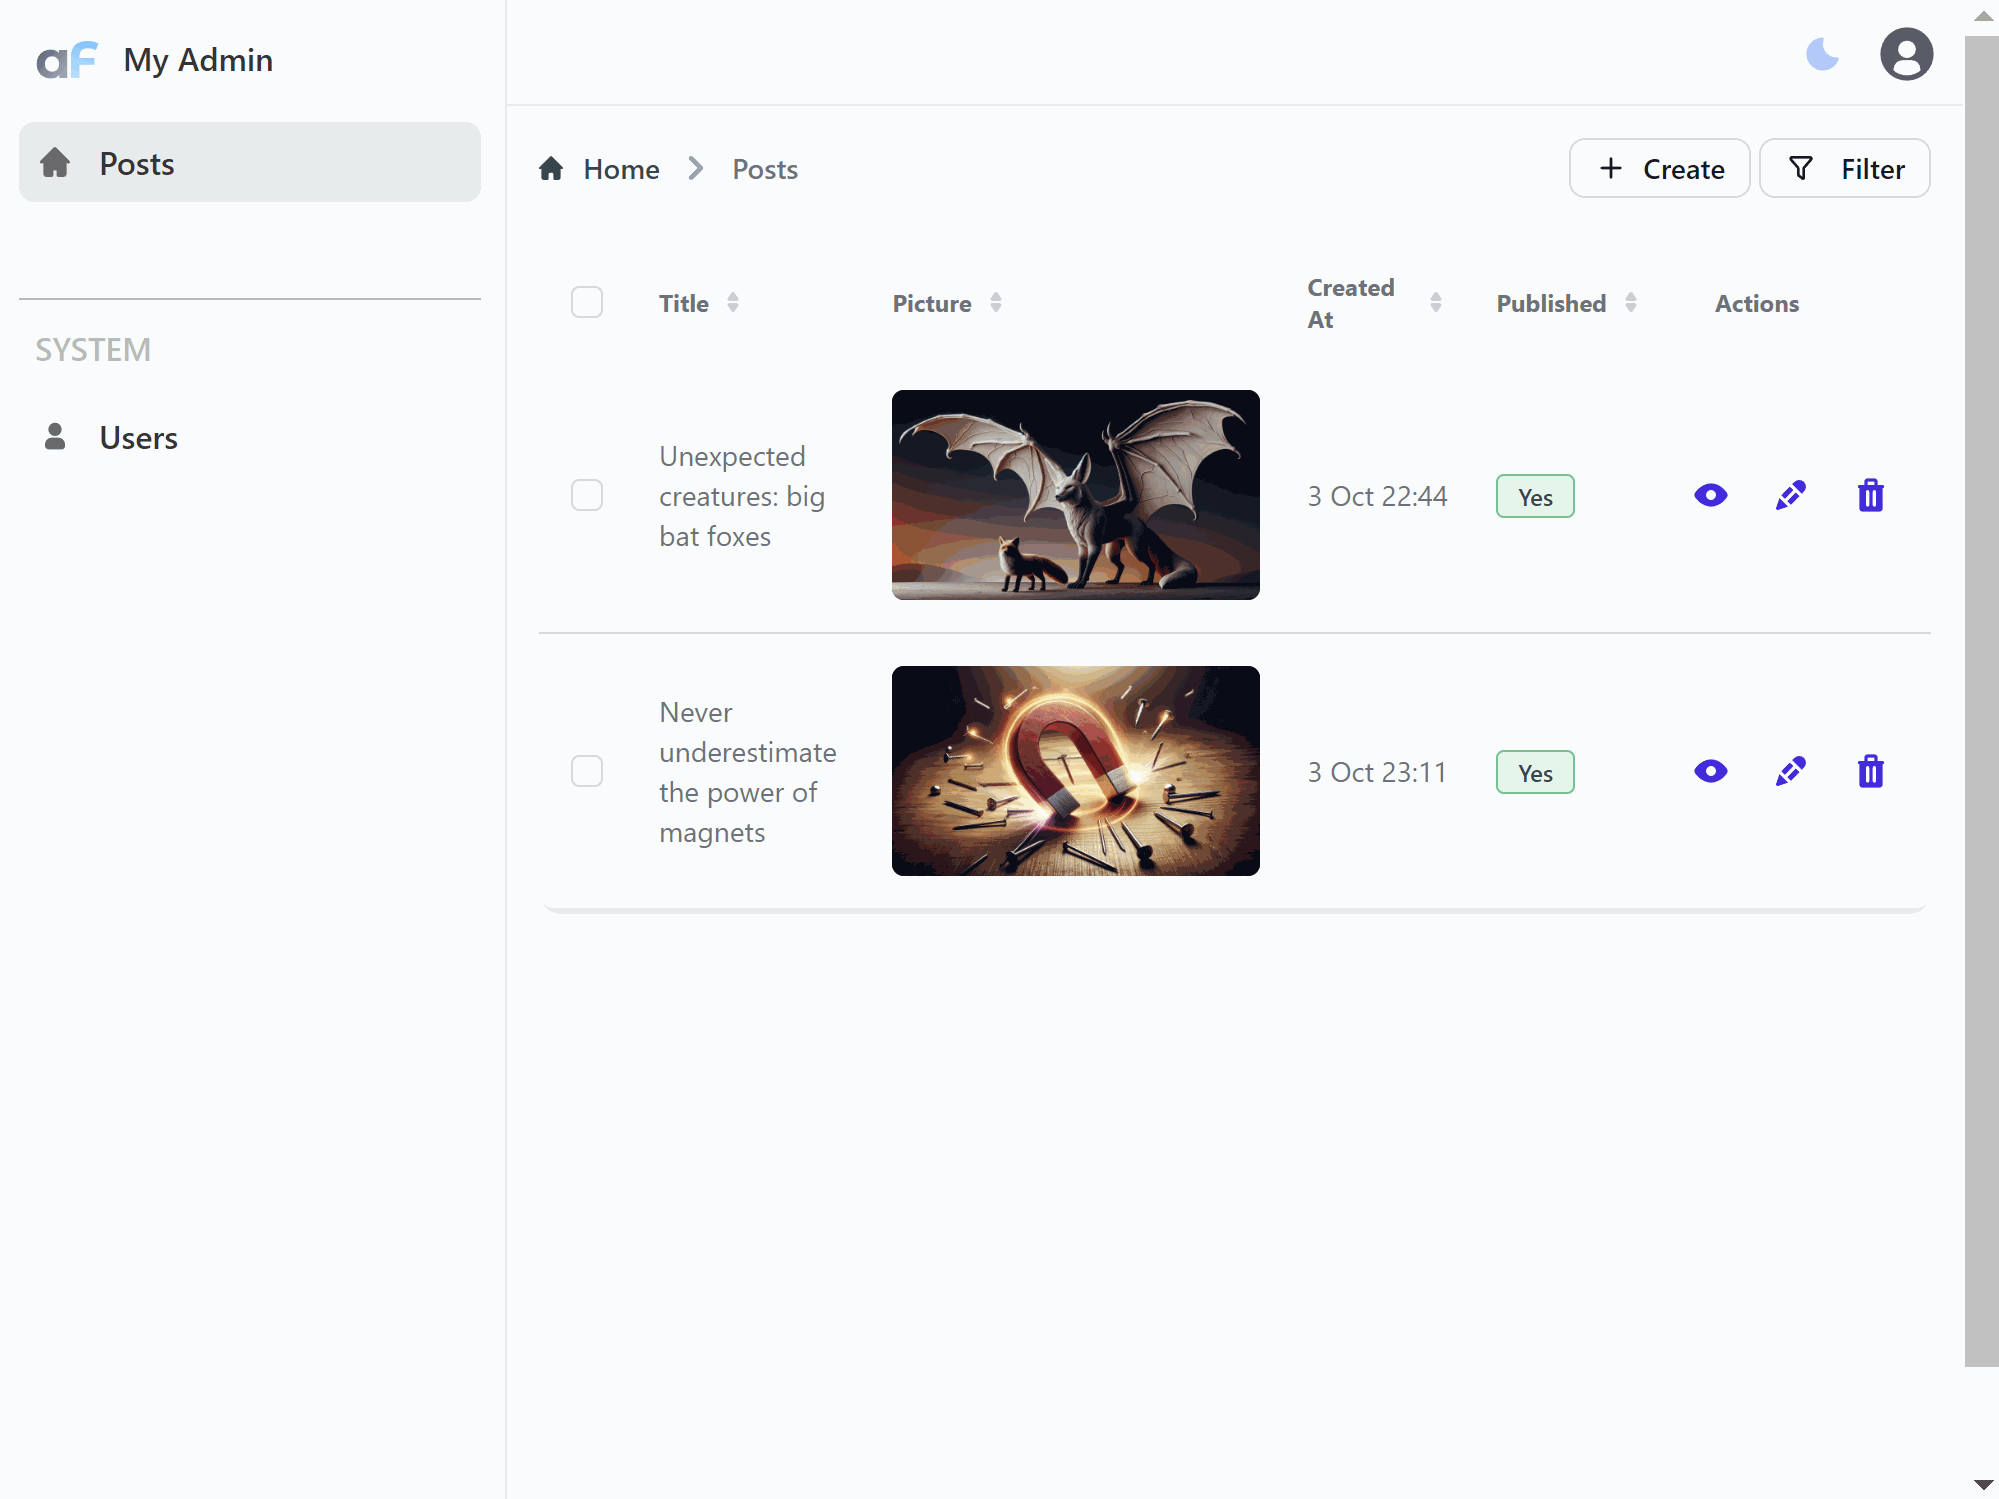
Open http://localhost:3500 in your browser and you will see your blog with posts from admin panel:

Go to http://localhost:3500/admin to add new posts.
Step 7: Deploy
We will use Docker to make it easy to deploy with many ways. We will wrap both Node.js adminforth app and Nuxt.js app into single container for simplicity using supervisor. However you can split them into two containers and deploy them separately e.g. using docker compose.
Please note that in this demo example we routing requests to Nuxt.js app from AdminForth app using http-proxy. While this will work fine, it might give slower serving then if you would route traffik using dedicated reverse proxies like traefik or nginx.
Dockerize AdminForth and Nuxt in single container
Open Dockerfile in root project directory (ai-blog) and put in the following content:
FROM node:20-slim
EXPOSE 3500
WORKDIR /app
RUN apt-get update && apt-get install -y supervisor
COPY package.json package-lock.json ./
RUN npm ci
COPY seo/package.json seo/package-lock.json seo/
RUN cd seo && npm ci
COPY . .

RUN npx adminforth bundle
RUN cd seo && npm run build

RUN cat > /etc/supervisord.conf <<EOF
[supervisord]
nodaemon=true

[program:app]
command=npm run prod
directory=/app
autostart=true
autorestart=true
stdout_logfile=/dev/stdout
stderr_logfile=/dev/stderr
stdout_logfile_maxbytes = 0
stderr_logfile_maxbytes = 0

[program:seo]
command=sh -c "cd seo && node .output/server/index.mjs"
directory=/app
autostart=true
autorestart=true
stdout_logfile=/dev/stdout
stderr_logfile=/dev/stderr
stdout_logfile_maxbytes = 0
stderr_logfile_maxbytes = 0

[program:prisma]
command=npm run migrate:prod
directory=/app
autostart=true
stdout_logfile=/dev/stdout
stderr_logfile=/dev/stderr
stdout_logfile_maxbytes = 0
stderr_logfile_maxbytes = 0

EOF

CMD ["supervisord", "-c", "/etc/supervisord.conf"]
Open .dockerignore file in root project directory (ai-blog) and put in the following content:
.env
node_modules
seo/node_modules
.git
db
*.tar
.terraform*
terraform*
*.tf
Build and run your docker container locally:
docker build -t my-ai-blog .
docker run -p80:3500 -v ./prodDb:/app/db --env-file .env -it --name my-ai-blog -d my-ai-blog
Now you can open http://localhost in your browser and see your blog.
Deploy to EC2 with terraform
First of all install Terraform as described here terraform installation.
If you are on Ubuntu(WSL2 or native) you can use the following commands:
wget -O- https://apt.releases.hashicorp.com/gpg | sudo gpg --dearmor -o /usr/share/keyrings/hashicorp-archive-keyring.gpg
echo "deb [signed-by=/usr/share/keyrings/hashicorp-archive-keyring.gpg] https://apt.releases.hashicorp.com $(lsb_release -cs) main" | sudo tee /etc/apt/sources.list.d/hashicorp.list
sudo apt update && sudo apt install terraform
Create special AWS credentials for deployemnts by going to AWS console -> IAM -> Users -> Add user (e.g. my-ai-blog-user) -> Attach existing policies directly -> AdministratorAccess -> Create user. Save Access key ID and Secret access key into ~/.aws/credentials file:
Create or open file:
code ~/.aws/credentials
...

[myaws]
aws_access_key_id = YOUR_ACCESS_KEY
aws_secret_access_key = YOUR_SECRET
Create file main.tf in root project directory:
provider "aws" {
  region = "eu-central-1"
  profile = "myaws"
}

data "aws_ami" "amazon_linux" {
  most_recent = true
  owners      = ["amazon"]

  filter {
    name   = "name"
    values = ["amzn2-ami-hvm-*-x86_64-gp2"]
  }
}

data "aws_vpc" "default" {
  default = true
}

data "aws_subnet" "default_subnet" {
  filter {
    name   = "vpc-id"
    values = [data.aws_vpc.default.id]
  }

  filter {
    name   = "default-for-az"
    values = ["true"]
  }

  filter {
    name   = "availability-zone"
    values = ["eu-central-1a"]
  }
}

resource "aws_security_group" "instance_sg" {
  name   = "my-aiblog-instance-sg"
  vpc_id = data.aws_vpc.default.id

  ingress {
    description = "Allow HTTP"
    from_port   = 80
    to_port     = 80
    protocol    = "tcp"
    cidr_blocks = ["0.0.0.0/0"]
  }

  # SSH
  ingress {
    description = "Allow SSH"
    from_port   = 22
    to_port     = 22
    protocol    = "tcp"
    cidr_blocks = ["0.0.0.0/0"]
  }

  egress {
    description = "Allow all outbound traffic"
    from_port   = 0
    to_port     = 0
    protocol    = "-1"
    cidr_blocks = ["0.0.0.0/0"]
  }
}

resource "aws_key_pair" "deployer" {
  key_name   = "terraform-deployer-my-aiblog-key"
  public_key = file("~/.ssh/id_rsa.pub") # Path to your public SSH key
}


resource "aws_instance" "docker_instance" {
  ami                    = data.aws_ami.amazon_linux.id
  instance_type          = "t3a.small"
  subnet_id              = data.aws_subnet.default_subnet.id
  vpc_security_group_ids = [aws_security_group.instance_sg.id]
  key_name               = aws_key_pair.deployer.key_name

  # prevent accidental termination of ec2 instance and data loss
  # if you will need to recreate the instance still (not sure why it can be?), you will need to remove this block manually by next command:
  # > terraform taint aws_instance.app_instance
  lifecycle {
    prevent_destroy = true
    ignore_changes = [ami]
  }

  user_data = <<-EOF
    #!/bin/bash
    yum update -y
    amazon-linux-extras install docker -y
    systemctl start docker
    systemctl enable docker
    usermod -a -G docker ec2-user

    echo "done" > /home/ec2-user/user-data-done
  EOF

  tags = {
    Name = "my-ai-blog-instance"
  }
}

resource "null_resource" "wait_for_user_data" {
  provisioner "remote-exec" {
    inline = [
      "echo 'Waiting for EC2 software install to finish...'",
      "while [ ! -f /home/ec2-user/user-data-done ]; do sleep 2; done",
      "echo 'EC2 software install finished.'"
    ]

    connection {
      type        = "ssh"
      user        = "ec2-user"
      private_key = file("~/.ssh/id_rsa")
      host        = aws_instance.docker_instance.public_ip
    }
  }

  depends_on = [aws_instance.docker_instance]
}


resource "null_resource" "build_image" {
  provisioner "local-exec" {
    command = "docker build -t blogapp . && docker save blogapp:latest -o blogapp_image.tar"
  }
  triggers = {
    always_run = timestamp() # Force re-run if necessary
  }
}

resource "null_resource" "remote_commands" {
  depends_on = [null_resource.wait_for_user_data, null_resource.build_image]

  triggers = {
    always_run = timestamp()
  }


  provisioner "file" {
    source      = "${path.module}/blogapp_image.tar"
    destination = "/home/ec2-user/blogapp_image.tar"

    connection {
      type        = "ssh"
      user        = "ec2-user"
      private_key = file("~/.ssh/id_rsa")
      host        = aws_instance.docker_instance.public_ip
    }
  }

  provisioner "file" {
    source      = "${path.module}/.env"
    destination = "/home/ec2-user/.env"

    connection {
      type        = "ssh"
      user        = "ec2-user"
      private_key = file("~/.ssh/id_rsa")
      host        = aws_instance.docker_instance.public_ip
    }
  }

  provisioner "remote-exec" {
    inline = [
      "sudo docker system prune -af",
      "docker load -i /home/ec2-user/blogapp_image.tar",
      "sudo docker rm -f blogapp || true",
      "sudo docker run --env-file .env -d -p 80:3500 --name blogapp -v /home/ec2-user/db:/app/db blogapp"
    ]

    connection {
      type        = "ssh"
      user        = "ec2-user"
      private_key = file("~/.ssh/id_rsa")
      host        = aws_instance.docker_instance.public_ip
    }
  }


}

output "instance_public_ip" {
  value = aws_instance.docker_instance.public_ip
}
Now you can deploy your app to AWS EC2:
terraform init
terraform apply -auto-approve
☝️ To destroy and stop billing run
terraform destroy -auto-approve
☝️ To check logs run
ssh -i ~/.ssh/id_rsa ec2-user@$(terraform output instance_public_ip), thensudo docker logs -n100 -f aiblog
Terraform config will build the Docker image locally and then copy it to the EC2 instance. This approach saves build resources (CPU/RAM) on the EC2 instance, though it increases network traffic (the image might be around 200MB). If you prefer to build the image directly on the EC2 instance, you can slightly adjust the configuration: remove null_resource.build_image and modify null_resource.remote_commands to perform the build remotely. However, note that building the image on a t3.small instance may still consume significant resources and can interfere with running applications. To avoid potential downtime or performance issues, building the image locally remains the recommended approach.
Add HTTPs and CDN
For adding HTTPS and CDN you will use free Cloudflare service (though you can use paid AWS Cloudfront or any different way e.g. add Traefik and Let's Encrypt). Go to https://cloudflare.com and create an account. Add your domain and follow instructions to change your domain nameservers to Cloudflare ones.
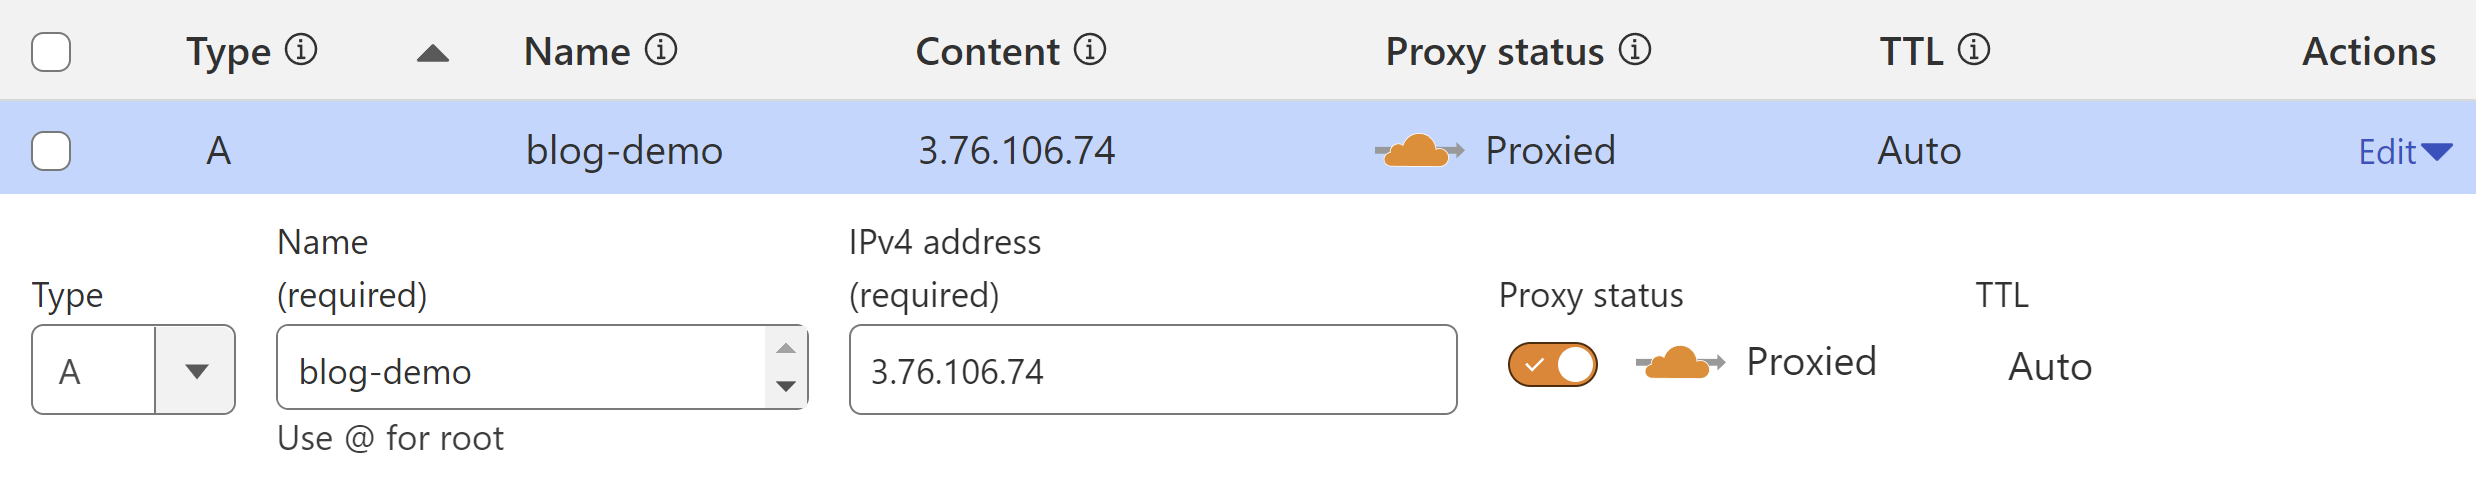
Go to your domain settings and add A record with your server IP address, which was shown in output of terraform apply command.
Type: A
Name: blog
Value: x.y.z.w
Cloudflare proxy: orange (enabled)