IaaC Simplified: Amazon EC2 Deployments with GitHub Actions, Terraform, Docker & Amazon ECR

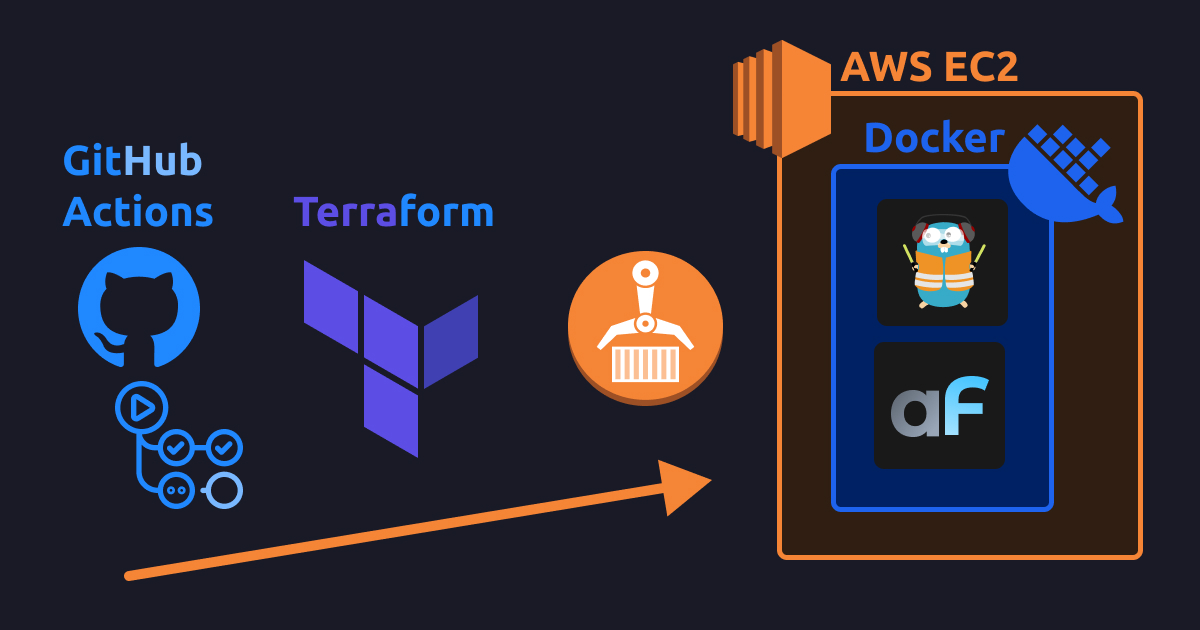
This guide shows how to deploy own Docker apps (with AdminForth as example) to Amazon EC2 instance with Docker and Terraform involving pushing images into Amazon ECR.
Needed resources:
- GitHub actions Free plan which includes 2000 minutes per month (1000 of 2-minute builds per month - more then enough for many projects, if you are not running tests). Extra builds would cost
0.008$per minute. - AWS account where we will auto-spawn EC2 instance. We will use
t3a.smallinstance (2 vCPUs, 2GB RAM) which costs~14$per month inus-east-1region (cheapest region). Also it will take$2per month for EBS gp2 storage (20GB) for EC2 instance. - Also AWS ECR will charge for
$0.09per GB of data egress traffic (from EC2 to the internet) - this needed to load docker build cache.
The setup shape:
- Build is done using IaaC approach with HashiCorp Terraform, so almoast no manual actions are needed from you. Every resource including EC2 server instance is described in code which is commited to repo.
- Docker build process is done on GitHub actions server, so EC2 server is not overloaded with builds
- Changes in infrastructure including changing server type, adding S3 Bucket, changing size of sever disk is also can be done by commiting code to repo.
- Docker images and build cache are stored on Amazon ECR
- Total build time for average commit to AdminForth app (with Vite rebuilds) is around 2 minutes.
Previously we had a blog post about deploying AdminForth to EC2 with Terraform without registry. That method might work well but has a significant disadvantage - build process happens on EC2 itself and uses EC2 RAM and CPU. This can be a problem if your EC2 instance is well-loaded without extra free resources. Moreover, low-end EC2 instances have a small amount of RAM and CPU, so build process which involves vite/tsc/etc can be slow or even fail / cause OOM killer to crash EC2 instance.
So obviously to solve this problem we need to move the build process to CI, however it introduces new chellenges and we will solve them in this post.
Quick difference between approaches from previous post and current post:
| Feature | Without Registry | With ECR Registry |
|---|---|---|
| How build happens | Source code is rsync-ed from CI to EC2 and docker build is done there | Docker build is done on CI and docker image is pushed to registry, then Docker on EC2 pulls from registry |
| Where build is done | On EC2 | On CI |
| How Docker build layers are cached | Cache is stored on EC2 | GitHub actions has no own Docker cache out of the box, so it should be stored in dedicated place (we use Amazon ECR) |
| Advantages | Cheaper (no egrass cache traffik from EC2) and faster | Build is done on CI, so EC2 server is not overloaded |
| Disadvantages | Build on EC2 requires additional server RAM / requires swap / overloads CPU | More terraform code is needed. Extra cost for egress traffik to GitHub for cache transfer |
| Initial build time* | 3m 13.541s | 3m 54s |
Rebuild time (changed index.ts)* | 0m 51.653s | 0m 54.120s |
Chellenges when you build on CI
A little bit of theory.
When you move build process to CI you have to solve next chellenges:
- We need to deliver built docker images to EC2 somehow (and only we)
- We need to persist cache between builds
Delivering images
Exporing images to tar files
Simplest option which you can find is save docker images to tar files and deliver them to EC2. We can easily do it in terraform (using docker save -o ... command on CI and docker load ... command on EC2). However this option has a significant disadvantage - it is slow. Docker images are big (always include all layers, without any options), so it takes infinity to do save/load and another infinity to transfer them to EC2 (via relatively slow rsync/SSH and relatively slow GitHub actions outbound connection).
Docker registry
Faster, right option which we will use here - involve Docker registry. Registry is a repository which stores docker images. It does it in a smart way - it saves each image as several layers, so if you will update last layer, then only last layer will be pushed to registry and then only last will be pulled to EC2.
To give you row compare - whole-layers image might take 1GB, but last layer created by npm run build command might take 50MB. And most builds you will do only last layer changes, so it will be 20 times faster to push/pull last layer than whole image.
And this is not all, registry uses TLS HTTP protocol so it is faster then SSH/rsync encrypted connection.
Of course you have to care about a way of registry authentication (so only you and your CI/EC2 can push/pull images).
What docker registry can you use? Pretty known options:
- Docker Hub - most famous. It is free for public images, so literally every opensource project uses it. However it is not free for private images, and you have to pay for it. Payment model is pretty strange - you pay for user who can login, like 11$ per month, you might pay for your devops only but all this sounds strange.
- GHCR - Registry from GitHub. Has free plan but allows to store only 500MB and allows to transfer 1GB of traffic per month. Then you pay for every extra GB in storage (
$0.0008per GB/day or$0.24per GB/month) and for every extra GB in traffic ($0.09 per GB). Probably small images will fit in free plan, but generally even alpine-based docker images are bigger than 500MB, so it is non-free option. - Amazon ECR - Same as GHCR but from Amazon. Price is
$0.10per GB of storage per month and$0.09per GB of data transfer from Amazon (as all Amazon egress traffic). So it is cheaper than GHCR. - Self-hosted registry web system. In our software development company, we use Harbor. It is a powerful free open-source registry that can be installed to own server. It allows pushing and pulling without limit. Also, it has internal life-cycle rules that cleanup unnecessary images and layers. The main drawbacks of it are that it is not so fast to install and configure, plus you have to get a domain and another powerfull server to run it. So unless you are a software development company, it is not worth using it.
- Self-hosted minimal CNCF Distribution registry on EC2 itself. So since we already have EC2, we can run registry on it directly. The
registrycontainer is pretty light-weight and it will not consume a lot of extra CPU/RAM on server. Plus images will be stored close to application so pull will be fast, however securing this right is a bit tricky. If you want to try it we have special EC2 with CNCF registry post.
In the post we will use Amazon ECR as registry (3rd way).
Persisting cache
Docker builds without layer cache persistence are possible but very slow. Most builds only change a couple of layers, and having no ability to cache them will cause the Docker builder to regenerate all layers from scratch. This can, for example, increase the Docker build time from a minute to ten minutes or even more.
Out of the box, GitHub Actions can't save Docker layers between builds, so you have to use external storage.
Though some CI systems can persist docker build cache, e.g. open-source self-hosted Woodpecker CI allows it out of the box. However GitHub actions which is pretty popular, reasonably can't allow such free storage to anyone
So when build-in Docker cache can't be used, there is one alternative - Docker BuildKit external cache. So BuildKit allows you to connect external storage. There are several options, but most sweet for us is using Docker registry as cache storage (not only as images storage to deliver them to application server).
Drawback is that buildx which is running on GitHub action server will download cache from registry which is inside of AWS. And all AWS egress traffic is charged. So you will pay for every build which uses cache. However cache is comnpressed. To give you idea basic alpine image with AdminForth cache is 180MB. One one commercial project we did full release within 2 months and 400 builds so it took 400 * 180MB * $0.09 / GB = $6.48 for cache transfer for whole project.
BuildKit cache in Compose issue Previously we used docker compose to build & run our app, it can be used to both build, push and pull images, but has issues with external cache connection. While they are not solved we have to use
docker buildx bakecommand to build images. It is not so bad, but is another point of configuration which we will cover in this post.
Prerequisites
I will assume you run Ubuntu (Native or WSL2).
You should have terraform, here is official repository:
wget -O - https://apt.releases.hashicorp.com/gpg | sudo gpg --dearmor -o /usr/share/keyrings/hashicorp-archive-keyring.gpg
echo "deb [arch=$(dpkg --print-architecture) signed-by=/usr/share/keyrings/hashicorp-archive-keyring.gpg] https://apt.releases.hashicorp.com $(lsb_release -cs) main" | sudo tee /etc/apt/sources.list.d/hashicorp.list
sudo apt update && sudo apt install terraform
AWS CLI:
sudo snap install aws-cli --classic
Also you need Doker Daemon running. We recommend Docker Desktop running. ON WSL2 make sure you have Docker Desktop WSL2 integration enabled.
docker version
Practice - deploy setup
Assume you have your AdminForth project in myadmin.
Step 1 - Dockerfile and .dockerignore
This guide assumes you have created your AdminForth application with latest version of adminforth create-app command.
This command already creates a Dockerfile and .dockerignore for you, so you can use them as is.
Step 2 - compose.yml
create folder deploy and create file compose.yml inside:
services:
  traefik:
    image: "traefik:v2.5"
    command:
      - "--api.insecure=true"
      - "--providers.docker=true"
      - "--entrypoints.web.address=:80"
    ports:
      - "80:80"
    volumes:
      - "/var/run/docker.sock:/var/run/docker.sock:ro"

  myadmin:
    image: ${MYADMIN_REPO}:latest
    build:
      context: ../adminforth-app
      tags:
        - ${MYADMIN_REPO}:latest
      cache_from:
        - type=registry,ref=${MYADMIN_REPO}:cache
      cache_to:
        - type=registry,ref=${MYADMIN_REPO}:cache,mode=max,compression=zstd,image-manifest=true,oci-mediatypes=true

    pull_policy: always
    restart: always
    env_file:
      - .env.secrets.prod

    volumes:
      - myadmin-db:/code/db
    labels:
      - "traefik.enable=true"
      - "traefik.http.routers.myadmin.rule=PathPrefix(`/`)"
      - "traefik.http.services.myadmin.loadbalancer.server.port=3500"
      - "traefik.http.routers.myadmin.priority=2"

volumes:
  myadmin-db:
Step 3 - create a SSH keypair
Make sure you are still in deploy folder, run next command:
mkdir .keys && ssh-keygen -f .keys/id_rsa -N ""
Now it should create deploy/.keys/id_rsa and deploy/.keys/id_rsa.pub files with your SSH keypair. Terraform script will put the public key to the EC2 instance and will use private key to connect to the instance. Also you will be able to use it to connect to the instance manually.
Step 4 - create TLS certificates to encrypt traffic between CI and registry
Make sure you are still in deploy folder, run next command:
Run next command to create TLS certificates:
openssl req -new -x509 -days 3650 -newkey rsa:4096 -nodes -keyout .keys/ca.key -subj "/CN=My Custom CA" -out .keys/ca.pem
This will create deploy/.keys/ca.key and deploy/.keys/ca.pem files.
Step 5 - .gitignore file
Create deploy/.gitignore file with next content:
.terraform/
.keys/
*.tfstate
*.tfstate.*
*.tfvars
tfplan
.env.secrets.prod
Step 6 - file with secrets for local deploy
Create file deploy/.env.secrets.prod
ADMINFORTH_SECRET=<your_secret>
Step 7 - main terraform file main.tf
First of all install Terraform as described here terraform installation.
Create file main.tf in deploy folder:
locals {
  app_name = "testtf"
  aws_region = "us-east-1"
}

provider "aws" {
  region = local.aws_region
  profile = "myaws"
}

data "aws_ami" "ubuntu_linux" {
  most_recent = true
  owners      = ["amazon"]

  filter {
    name   = "name"
    values = ["ubuntu/images/hvm-ssd-gp3/ubuntu-noble-24.04-amd64-server-*"]
  }
}

data "aws_vpc" "default" {
  default = true
}

resource "aws_eip" "eip" {
 domain = "vpc"
}

resource "aws_eip_association" "eip_assoc" {
 instance_id   = aws_instance.app_instance.id
 allocation_id = aws_eip.eip.id
}

data "aws_subnet" "default_subnet" {
  filter {
    name   = "vpc-id"
    values = [data.aws_vpc.default.id]
  }

  filter {
    name   = "default-for-az"
    values = ["true"]
  }

  filter {
    name   = "availability-zone"
    values = ["${local.aws_region}a"]
  }
}

resource "aws_security_group" "instance_sg" {
  name   = "${local.app_name}-instance-sg"
  vpc_id = data.aws_vpc.default.id

  ingress {
    description = "Allow HTTP"
    from_port   = 80
    to_port     = 80
    protocol    = "tcp"
    cidr_blocks = ["0.0.0.0/0"]
  }

  # SSH
  ingress {
    description = "Allow SSH"
    from_port   = 22
    to_port     = 22
    protocol    = "tcp"
    cidr_blocks = ["0.0.0.0/0"]
  }

  egress {
    description = "Allow all outbound traffic"
    from_port   = 0
    to_port     = 0
    protocol    = "-1"
    cidr_blocks = ["0.0.0.0/0"]
  }
}

resource "aws_key_pair" "app_deployer" {
  key_name   = "terraform-deploy_${local.app_name}-key"
  public_key = file("./.keys/id_rsa.pub") # Path to your public SSH key
}

resource "aws_instance" "app_instance" {
  ami                    = data.aws_ami.ubuntu_linux.id
  instance_type          = "t3a.small"  # just change it to another type if you need, check https://instances.vantage.sh/
  subnet_id              = data.aws_subnet.default_subnet.id
  vpc_security_group_ids = [aws_security_group.instance_sg.id]
  key_name               = aws_key_pair.app_deployer.key_name
  iam_instance_profile = aws_iam_instance_profile.ec2_profile.name

  # prevent accidental termination of ec2 instance and data loss
  # if you will need to recreate the instance still (not sure why it can be?), you will need to remove this block manually by next command:
  # > terraform taint aws_instance.app_instance
  lifecycle {
    prevent_destroy = true
    ignore_changes = [ami]
  }

  root_block_device {
    volume_size = 20 // Size in GB for root partition
    volume_type = "gp2"

    # Even if the instance is terminated, the volume will not be deleted, delete it manually if needed
    delete_on_termination = false
  }

  user_data = <<-EOF
    #!/bin/bash
    set -euo pipefail

    LOG_FILE="/home/ubuntu/user_data.log"
    exec > >(tee -a "$LOG_FILE") 2>&1
    chown ubuntu:ubuntu "$LOG_FILE" || true

    touch /home/ubuntu/user_data_started

    on_error() {
      echo "failed" > /home/ubuntu/user_data_failed
    }
    trap on_error ERR

    export DEBIAN_FRONTEND=noninteractive

    apt-get update
    apt-get install -y --no-install-recommends \
      ca-certificates \
      curl

    # Install the latest Docker Engine from Docker's official Ubuntu repo
    install -m 0755 -d /etc/apt/keyrings
    curl -fsSL https://download.docker.com/linux/ubuntu/gpg -o /etc/apt/keyrings/docker.asc
    chmod a+r /etc/apt/keyrings/docker.asc

    echo \
      "deb [arch=$(dpkg --print-architecture) signed-by=/etc/apt/keyrings/docker.asc] https://download.docker.com/linux/ubuntu \
      $(. /etc/os-release && echo "$VERSION_CODENAME") stable" \
      > /etc/apt/sources.list.d/docker.list

    apt-get update
    apt-get install -y --no-install-recommends \
      docker-ce \
      docker-ce-cli \
      containerd.io \
      docker-buildx-plugin \
      docker-compose-plugin

    # Ensure Docker daemon is up
    systemctl enable --now docker

    # Allow ubuntu user to run docker without sudo (new SSH session required)
    usermod -aG docker ubuntu || true

    docker --version
    docker compose version

    echo "done" > /home/ubuntu/user_data_done

  EOF

  tags = {
    Name = "${local.app_name}-instance"
  }
}

resource "null_resource" "wait_for_user_data" {
  provisioner "remote-exec" {
    inline = [
      "echo 'Waiting for EC2 software install to finish...'",
      "while [ ! -f /home/ubuntu/user_data_done ]; do echo '...'; sleep 2; done",
      "echo 'EC2 software install finished.'"
    ]

    connection {
      type        = "ssh"
      user        = "ubuntu"
      private_key = file("./.keys/id_rsa")
      host        = aws_eip_association.eip_assoc.public_ip
    }
  }

  depends_on = [aws_instance.app_instance]
}

resource "aws_ecr_repository" "myadmin_repo" {
  name = "${local.app_name}-myadmin"
  force_delete = true
}

resource "aws_ecr_lifecycle_policy" "safe_cleanup" {
  repository = aws_ecr_repository.myadmin_repo.name

  policy = jsonencode({
    rules = [
      {
        rulePriority = 1
        description  = "Delete untagged images older than 7 days"
        selection = {
          tagStatus     = "untagged"
          countType     = "sinceImagePushed"
          countUnit     = "days"
          countNumber   = 7
        }
        action = {
          type = "expire"
        }
      }
    ]
  })
}

resource "local_file" "compose_env" {
  content  = "MYADMIN_REPO=${aws_ecr_repository.myadmin_repo.repository_url}"
  filename = "${path.module}/.env.ecr"
}

// allow ec2 instance to login to ECR too pull images
resource "aws_iam_role" "ec2_role" {
  name = "${local.app_name}-ec2-role"

  assume_role_policy = jsonencode({
    Version = "2012-10-17",
    Statement = [{
      Effect = "Allow",
      Principal = {
        Service = "ec2.amazonaws.com"
      },
      Action = "sts:AssumeRole"
    }]
  })
}

resource "aws_iam_role_policy_attachment" "ecr_access" {
  role       = aws_iam_role.ec2_role.name
  policy_arn = "arn:aws:iam::aws:policy/AmazonEC2ContainerRegistryPowerUser"
}

resource "aws_iam_instance_profile" "ec2_profile" {
  name = "${local.app_name}-instance-profile"
  role = aws_iam_role.ec2_role.name
}

resource "null_resource" "sync_files_and_run" {

  provisioner "local-exec" {
    command = <<-EOF
      aws ecr get-login-password --region ${local.aws_region} --profile myaws | docker login --username AWS --password-stdin ${aws_ecr_repository.myadmin_repo.repository_url}

      echo "Running build"
      env $(cat .env.ecr | grep -v "#" | xargs) docker buildx bake --progress=plain --push --allow=fs.read=.. -f compose.yml

      # if you will change host, pleasee add -o StrictHostKeyChecking=no
      echo "Copy files to the instance"
      rsync -t -avz --mkpath -e "ssh -i ./.keys/id_rsa -o StrictHostKeyChecking=no" \
        --delete \
        --exclude '.terraform' \
        --exclude '.keys' \
        --exclude 'tfplan' \
        . ubuntu@${aws_eip_association.eip_assoc.public_ip}:/home/ubuntu/app/deploy/

      EOF
  }

  # Run docker compose after files have been copied
  provisioner "remote-exec" {
    inline = [<<-EOF
      aws ecr get-login-password --region ${local.aws_region} | docker login --username AWS --password-stdin ${aws_ecr_repository.myadmin_repo.repository_url}

      cd /home/ubuntu/app/deploy

      echo "Spinning up the app"
      docker compose --progress=plain -p app  --env-file .env.ecr -f compose.yml up -d --remove-orphans

      # cleanup unused cache (run in background to not block terraform)
      screen -dm docker system prune -f
    EOF
    ]

    connection {
      type        = "ssh"
      user        = "ubuntu"
      private_key = file("./.keys/id_rsa")
      host        = aws_eip_association.eip_assoc.public_ip
    }


  }

  # Ensure the resource is triggered every time based on timestamp or file hash
  triggers = {
    always_run = timestamp()
  }

  depends_on = [aws_eip_association.eip_assoc, null_resource.wait_for_user_data]
}


output "instance_public_ip" {
  value = aws_eip_association.eip_assoc.public_ip
}


######### META, tf state ##############


# S3 bucket for storing Terraform state
resource "aws_s3_bucket" "terraform_state" {
  bucket = "${local.app_name}-terraform-state"
}

resource "aws_s3_bucket_lifecycle_configuration" "terraform_state" {
  bucket = aws_s3_bucket.terraform_state.bucket

  rule {
    status = "Enabled"
    id = "Keep only the latest version of the state file"

    filter {
      prefix = ""
    }

    noncurrent_version_expiration {
      noncurrent_days = 30
    }
  }
}

resource "aws_s3_bucket_versioning" "terraform_state" {
  bucket = aws_s3_bucket.terraform_state.bucket

  versioning_configuration {
    status = "Enabled"
  }
}

resource "aws_s3_bucket_server_side_encryption_configuration" "terraform_state" {
  bucket = aws_s3_bucket.terraform_state.bucket

  rule {
    apply_server_side_encryption_by_default {
      sse_algorithm     = "AES256"
    }
  }
}
👆 Replace
<your_app_name>with your app name (no spaces, only underscores or letters)
Step 7.1 - Configure AWS Profile
Open or create file ~/.aws/credentials and add (if not already there):
[myaws]
aws_access_key_id = <your_access_key>
aws_secret_access_key = <your_secret_key>
Step 7.2 - Run deployment
We will run first deployment from local machine to create S3 bucket for storing Terraform state. In other words this deployment will create resources needed for storing Terraform state in the cloud and runnign deployment from GitHub actions.
In deploy folder run:
terraform init
Now run deployement:
terraform apply -auto-approve
👆 Please note that this command might block ask you your
sudopassword to appendappserver.localto/etc/hostsfile.
👆 Please note that command might show errors about pushing images, this is fine because current deployment is done here only to setup S3 bucket for state migration before migrating to cloud.
Step 8 - Migrate state to the cloud
First deployment had to create S3 bucket for storing Terraform state. Now we need to migrate the state to the cloud.
Add to the end of main.tf:
# Configure the backend to use the S3 bucket
terraform {
 backend "s3" {
   bucket         = "<your_app_name>-terraform-state"
   key            = "state.tfstate"  # Define a specific path for the state file
   region         = "us-east-1"
   profile        = "myaws"
   use_lockfile   = true
 }
}
👆 Replace
<your_app_name>with your app name (no spaces, only underscores or letters). Unfortunately we can't use variables, HashiCorp thinks it is too dangerous 😥
Now run:
terraform init -migrate-state
Now run test deployment:
terraform apply -auto-approve
Now you can delete local terraform.tfstate file and terraform.tfstate.backup file as they are in the cloud now.
Step 9 - CI/CD - Github Actions
Create file .github/workflows/deploy.yml:
name: Deploy myadmin
run-name: ${{ github.actor }} builds myadmin 🚀
on: [push]
jobs:
  Explore-GitHub-Actions:
    runs-on: ubuntu-latest

    concurrency:
      group: build-group
      cancel-in-progress: false

    steps:
      - run: echo "🎉 The job was automatically triggered by a ${{ github.event_name }} event."
      - run: echo "🐧 This job is now running on a ${{ runner.os }} server"
      - run: echo "🔎 The name of your branch is ${{ github.ref }}"
      - name: Check out repository code
        uses: actions/checkout@v4

      - name: Set up Terraform
        uses: hashicorp/setup-terraform@v2
        with:
          terraform_version: 1.10.1

      - name: Set up Docker Buildx
        uses: docker/setup-buildx-action@v3

      - name: Import SSH keys
        run: |
          mkdir -p deploy/.keys
          echo "$VAULT_SSH_PRIVATE_KEY" > deploy/.keys/id_rsa
          echo "$VAULT_SSH_PUBLIC_KEY" > deploy/.keys/id_rsa.pub
          chmod 600 deploy/.keys/id_rsa*
        env:
          VAULT_SSH_PRIVATE_KEY: ${{ secrets.VAULT_SSH_PRIVATE_KEY }}
          VAULT_SSH_PUBLIC_KEY: ${{ secrets.VAULT_SSH_PUBLIC_KEY }}

      - name: Setup AWS credentials
        run: |
          mkdir -p ~/.aws
          cat <<EOL > ~/.aws/credentials
          [myaws]
          aws_access_key_id=${VAULT_AWS_ACCESS_KEY_ID}
          aws_secret_access_key=${VAULT_AWS_SECRET_ACCESS_KEY}
          EOL
        env:
          VAULT_AWS_ACCESS_KEY_ID: ${{ secrets.VAULT_AWS_ACCESS_KEY_ID }}
          VAULT_AWS_SECRET_ACCESS_KEY: ${{ secrets.VAULT_AWS_SECRET_ACCESS_KEY }}

      - name: Prepare env
        run: |
          echo "ADMINFORTH_SECRET=$VAULT_ADMINFORTH_SECRET" > deploy/.env.secrets.prod
        env:
          VAULT_ADMINFORTH_SECRET: ${{ secrets.VAULT_ADMINFORTH_SECRET }}

      - name: Terraform build
        run: |
          cd deploy
          terraform init -reconfigure
          # example of unlocking tf state if needed
          # terraform force-unlock fb397548-8697-ea93-ab80-128a4f508fdf --force
          terraform plan -out=tfplan
          terraform apply tfplan


      - run: echo "🍏 This job's status is ${{ job.status }}."
Step 10 - Add secrets to GitHub
Go to your GitHub repository, then Settings -> Secrets -> New repository secret and add:
VAULT_AWS_ACCESS_KEY_ID- your AWS access keyVAULT_AWS_SECRET_ACCESS_KEY- your AWS secret keyVAULT_SSH_PRIVATE_KEY- executecat deploy/.keys/id_rsaand paste to GitHub secretsVAULT_SSH_PUBLIC_KEY- executecat deploy/.keys/id_rsa.puband paste to GitHub secretsVAULT_ADMINFORTH_SECRET- generate some random string and paste to GitHub secrets, e.g.openssl rand -base64 32 | tr -d '\n'
Now you can push your changes to GitHub and see how it will be deployed automatically.
Adding secrets
Once you will have sensitive tokens/passwords in your apps you have to store them in a secure way.
Simplest way is to use GitHub secrets.
Let's imagine you have OPENAI_API_KEY which will be used one of AI-powered plugins of adminforth. We can't put this key to the code, so we have to store it in GitHub secrets.
Open your GitHub repository, then Settings -> Secrets -> New repository secret and add VAULT_OPENAI_API_KEY with your key.
Now open GitHub actions file and add it to the env section:
      - name: Prepare env
        run: |
          echo "ADMINFORTH_SECRET=$VAULT_ADMINFORTH_SECRET" > deploy/.env.secrets.prod
          echo "OPENAI_API_KEY=$VAULT_OPENAI_API_KEY" >> deploy/.env.secrets.prod
        env:
          VAULT_ADMINFORTH_SECRET: ${{ secrets.VAULT_ADMINFORTH_SECRET }}
          VAULT_OPENAI_API_KEY: ${{ secrets.VAULT_OPENAI_API_KEY }}
In the same way you can add any other secrets to your GitHub actions.
How to connect to EC2 instance?
To connect to EC2 instance you can use SSH.
cd deploy
ssh -i ./.keys/id_rsa ubuntu@<your_ec2_ip>
IP address can be found in terminal output after terraform apply.
Out of space on EC2 instance? Extend EBS volume
To upgrade EBS volume size you have to do next steps:
In main.tf file:
  root_block_device {
    volume_size = 20 // Size in GB for root partition
    volume_size = 40 // Size in GB for root partition
    volume_type = "gp2"
  }
And run build.
This will increase physical size of EBS volume, but you have to increase filesystem size too.
Login to EC2 instance:
ssh -i ./.keys/id_rsa ubuntu@<your_ec2_ip>
You can find your EC2 IP in AWS console by visiting EC2 -> Instances -> Your instance -> IPv4 Public IP
Now run next commands:
lsblk
This would show something like this:
NAME    MAJ:MIN RM  SIZE RO TYPE MOUNTPOINT
loop0     7:0    0 99.4M  1 loop /snap/core/10908
nvme0n1 259:0    0   40G  0 disk
└─nvme0n1p1 259:1    0   20G  0 part /
Here we see that nvme0n1 is our disk and nvme0n1p1 is our partition.
Now to extend partition run:
sudo growpart /dev/nvme0n1 1
sudo resize2fs /dev/nvme0n1p1
This will extend partition to the full disk size. No reboot is needed.
Want slack notifications about build?
Create Slack channel and add Slack app to it.
Then create webhook URL and add it to GitHub secrets as SLACK_WEBHOOK_URL.
Add this steps to the end of your GitHub actions file:
      - name: Notify Slack on success
        if: success()
        run: |
          curl -X POST -H 'Content-type: application/json' --data \
          "{\"text\": \"✅ *${{ github.actor }}* successfully built *${{ github.ref_name }}* with commit \\\"${{ github.event.head_commit.message }}\\\".\n:link: <${{ github.server_url }}/${{ github.repository }}/actions/runs/${{ github.run_id }}|View Build> | :link: <${{ github.server_url }}/${{ github.repository }}/commit/${{ github.sha }}|View Commit>\"}" \
          $SLACK_WEBHOOK_URL
        env:
          SLACK_WEBHOOK_URL: ${{ secrets.SLACK_WEBHOOK_URL }}

      - name: Notify Slack on failure
        if: failure()
        run: |
          curl -X POST -H 'Content-type: application/json' --data \
          "{\"text\": \"❌ *${{ github.actor }}* failed to build *${{ github.ref_name }}* with commit \\\"${{ github.event.head_commit.message }}\\\".\n:link: <${{ github.server_url }}/${{ github.repository }}/actions/runs/${{ github.run_id }}|View Build> | :link: <${{ github.server_url }}/${{ github.repository }}/commit/${{ github.sha }}|View Commit>\"}" \
          $SLACK_WEBHOOK_URL
        env:
          SLACK_WEBHOOK_URL: ${{ secrets.SLACK_WEBHOOK_URL }}