Getting Started
This page provides a step-by-step guide to quickly get started with AdminForth using the adminforth CLI.
You will learn how to set up a new project using the adminforth create-app command and explore AdminForth’s fundamentals.
👆 For setup example without CLI check out Hello World without CLI
Prerequisites
AdminForth requires Node v20 or higher. If you’re on a different version, you can switch or install using:
nvm install 20
nvm alias default 20
nvm use 20
Creating an AdminForth Project
The recommended way to get started with AdminForth is via the create-app CLI, which scaffolds a basic fully functional back-office application. Apart from boilerplate, it creates one resource for user management.
There are two common setup paths:
Path 1: Existing Database
Use this path when you already have a database and your own schema or migrations. Pass your database URL with --db, or enter it when the CLI asks Please specify the database URL to use:
npx adminforth create-app --app-name myadmin --db "postgresql://user:password@localhost:5432/dbname"
When you provide your own database URL, the CLI treats this as your own database. It does not create Prisma schema or Prisma migration scripts for that database. Instead, the generated project README contains the SQL or schema notes for adding the required adminuser table with your own migration tool.
After the project is created, navigate into it and generate resources from your existing tables:
cd myadmin
npx adminforth resource
Resource files are needed for AdminForth to know about your tables and define how to work with them. Use npx adminforth resource again when you add new tables or change their schema.
Path 2: New Database
Use this path when you want AdminForth to scaffold a standalone app with a new local SQLite database. Omit --db, or accept the default sqlite://.db.sqlite value in the interactive prompt:
npx adminforth create-app --app-name myadmin
Or omit all options to be prompted interactively:
npx adminforth create-app
Once the project is created, navigate into its directory:
cd myadmin # or any other name you provided
For the new database path, the CLI can scaffold Prisma files and migration scripts for the default SQLite database.
CLI options:
--app-name- name for your project. Used inpackage.json,index.tsbranding, etc. Default value:adminforth-app.--db- database connection string. Currently PostgreSQL, MongoDB, SQLite, MySQL, Clickhouse and Qdrant (read only) are supported. Default value:sqlite://.db.sqlite
☝�️ Database Connection String format:
Format is
<scheme>://<username>:<password>@<host>:<port>/<database>. Examples:
- SQLite —
sqlite://.db.sqlite. If database not yet exists it will be created- PostgreSQL —
postgresql://user:password@localhost:5432/dbname- MongoDB —
mongodb://localhost:27017/dbname- Clickhouse —
clickhouse://localhost:8123/dbname- MySQL —
mysql://user:password@localhost:3306/dbname- Qdrant -
qdrant://localhost:6333
Understand the generated Project Structure
The CLI will create boilerplate files and folders in your current directory and install dependencies. A typical layout looks like this:
myadmin/
├── custom
│   ├── assets/           # Static assets like images, fonts, etc.
│   ├── package.json      # For any custom npm packages you will use in Vue files
│   └── tsconfig.json     # Tsconfig for Vue project (adds completion for AdminForth core components)
├── resources
│   └── adminuser.ts      # Example resource file for users management
├── schema.prisma         # Prisma schema file, generated only for the new database path
├── index.ts              # Main entry point: configures AdminForth & starts the server
├── package.json          # Project dependencies
├── pnpm-workspace.yaml
├── tsconfig.json         # TypeScript configuration
├── .env                  # Env vars like tokens, secrets that should not be in version control
├── .env.local            # General local environment variables
└── .gitignore
Initial Migration & Future Migrations
For the new database path, the CLI creates Prisma files for managing migrations. Prisma is not required by AdminForth itself, but it is a convenient migration tool for standalone projects that do not have database management yet.
CLI will suggest you a command to initialize the database with Prisma:
pnpm makemigration --name init && pnpm migrate:local
This will create a migration file and apply it to the database.
In future, when you need to add new resources, you need to modify schema.prisma (add models, change fields, etc.). After doing any modification you need to create a new migration using next command:
pnpm makemigration --name init ; pnpm migrate:local
Other developers need to pull migration and run pnpm migrate:local to apply any unapplied migrations.
For the existing database path, use your own migration tool instead. The generated project README shows how to add the required adminuser table to your database.
Run the Server
Now you can run your app:
pnpm start
Open http://localhost:3500 in your browser and (default credentials are adminforth/adminforth if you haven’t changed them).
AdminForth Basic Philosophy
AdminForth connects to existing databases and provides a back-office for managing data including CRUD operations, filtering, sorting, and more.
Database can be already created by using any database management tool, ORM or migrator.
AdminForth itself never modifies database schema, does not add columns or new tables. However for those who have no own migration managment AdminForth CLI suggests using Prisma. This allows to provide simple and reliable schema management for standalone projects which have no DB yet.
If you already have a database, you pass a connection string to AdminForth and define resources(tables) and describe columns you would like to see in back-office. For most DBs AdminForth can "discover" column types and constraints (e.g. max-length) by connecting to DB. However you can redefine them in AdminForth configuration. Type and constraints definition in AdminForth resource are take precedence over DB schema.
Also in AdminForth you can define in "Vue" way:
- how each field will be rendered
- create own pages e.g. Dashboard using AdminForth Components Library (AFCL) or any other Vue componetns.
- insert injections into standard pages (e.g. add diagram to list view)
Adding an apartments Model
So far, our freshly generated AdminForth project includes a default adminuser model and a corresponding adminuser resource.
Let’s expand our app to suport managment of apartments model. Adding new resource will involve next steps:
- Add a new Prisma model to your
schema.prisma. - Run a Prisma migration to update your database schema.
- Create a corresponding resource in the
resources/folder. - Register the new resource in
index.tsand see it in your AdminForth back-office.
Please note that steps 1 and 2 are compleatly independent from 3 and 4, so you can make them with any other way then Prisma.
Step 1. Define the apartments Model in schema.prisma
Open schema.prisma in your project root and add a new model for apartments:
...
model apartments {
  id                String     @id
  created_at        DateTime?
  title             String
  square_meter      Float?
  price             Decimal
  number_of_rooms   Int?
  description       String?
  country           String?
  listed            Boolean
  realtor_id        String?
}
Step 2. Create and Apply the Migration
Run the following command to create a new migration:
pnpm makemigration --name add-apartments ; pnpm migrate:local
Step3. Create the apartments resource
Use command to create a new file apartments.ts in the resources/ folder
npx adminforth resource
After the resource file is generated, extend it with display and validation settings.
- Use recordLabel to control how each record is represented in lists and relations.
- Apply fillOnCreate to automatically populate fields during creation (e.g., generated IDs or timestamps).
- Add minLength and maxLength to string fields to enforce input constraints.
- Use enum to limit fields to predefined values and render them as dropdowns in the UI.
- Configure allowedActions to control which operations are available for the resource (editing, deleting, viewing, and filtering).
To properly apply these changes, refer to the example below and adjust the configuration according to your settings
import { AdminForthResourceInput, AdminForthDataTypes } from 'adminforth';

export default {
  dataSource: 'maindb',
  table: 'apartments',
  resourceId: 'apartments'
  resourceId: 'aparts', // resourceId is defaulted to table name but you can redefine it like this e.g.
  // in case of same table names from different data sources
  label: 'Apartments',   // label is defaulted to table name but you can change it
  recordLabel: (r) => `🏡 ${r.title}`,
  columns: [
    {
      name: 'id',
      type: AdminForthDataTypes.STRING,
      label: 'Identifier',  // if you wish you can redefine label, defaulted to uppercased name
      showIn: { // show column in filter and in show page
        all:true,
        list: false,
        edit: false,
        create: false,
      },
      primaryKey: true,
      fillOnCreate: ({ initialRecord, adminUser }) => Math.random().toString(36).substring(7),  // called during creation to generate content of field, initialRecord is values user entered, adminUser object of user who creates record
    },
    {
      name: "title",
      required: true,
      showIn: {
        all:true, // all available options
      },
      type: AdminForthDataTypes.STRING,
      maxLength: 255,  // you can set max length for string fields
      minLength: 3,  // you can set min length for string fields
    },
    {
      name: 'created_at',
      type: AdminForthDataTypes.DATETIME,
      allowMinMaxQuery: true,
      showIn: {
        all:true,
        create: false,
      },
      fillOnCreate: ({ initialRecord, adminUser }) => (new Date()).toISOString(),
    },
    {
      name: 'price',
      showIn: {
        all:true,
      },
      inputSuffix: 'USD', // you can add a suffix to an input field that will be displayed when creating or editing records
      allowMinMaxQuery: true,  // use better experience for filtering e.g. date range, set it only if you have index on this column or if you sure there will be low number of rows
      editingNote: 'Price is in USD',  // you can put a note near field on editing or creating page
    },
    {
      name: 'square_meter',
      label: 'Square',
      allowMinMaxQuery: true,
      showIn: {
        all:true,
      },
      minValue: 1,  // you can set min /max value for number columns so users will not be able to enter more/less
      maxValue: 1000,
    },
    {
      name: 'number_of_rooms',
      allowMinMaxQuery: true,
      showIn: {
        all:true,
      },
      enum: [
        { value: 1, label: '1 room' },
        { value: 2, label: '2 rooms' },
        { value: 3, label: '3 rooms' },
        { value: 4, label: '4 rooms' },
        { value: 5, label: '5 rooms' },
      ],
    },
    {
      name: 'description',
      sortable: false,
      showIn: {
        all:true,
        list: false,
      }
    },
    {
      name: 'country',
      showIn: {
        all:true,
      },
      enum: [{
        value: 'US',
        label: 'United States'
      }, {
        value: 'DE',
        label: 'Germany'
      }, {
        value: 'FR',
        label: 'France'
      }, {
        value: 'GB',
        label: 'United Kingdom'
      }, {
        value: 'NL',
        label: 'Netherlands'
      }, {
        value: 'IT',
        label: 'Italy'
      }, {
        value: 'ES',
        label: 'Spain'
      }, {
        value: 'DK',
        label: 'Denmark'
      }, {
        value: 'PL',
        label: 'Poland'
      }, {
        value: 'UA',
        label: 'Ukraine'
      }, {
        value: null,
        label: 'Not defined'
      }],
    },
    {
      name: 'listed',
      required: true,  // will be required on create/edit
      showIn: {
        all:true,
      }
    },
    {
      name: 'realtor_id',
      foreignResource: {
        resourceId: 'adminuser',
        searchableFields: ["id", "email"], // fields available for search in filter
      },
      showIn: {
        all:true,
      }
    }
  ],
  options: {
    listPageSize: 10,
    allowedActions: {
      edit: true,
      delete: true,
      show: true,
      filter: true,
    },
  },
} as AdminForthResourceInput;
Step 4. Register the apartments Resource
Open index.ts in your project root and import the new resource:
...
import apartmentsResource from "./resources/apartments.js";

...
export const admin = new AdminForth({
  ...
  menu: [
    {
      label: 'Core',
      icon: 'flowbite:brain-solid',
      open: true,
      children: [
        {
          homepage: true,
          label: 'Apartments',
          icon: 'flowbite:home-solid',
          resourceId: 'aparts',
        },
      ]
    },
    { type: 'gap' },
    { type: 'divider' },
    {
      type: 'heading',
      label: 'SYSTEM'
    },
    {
      label: 'Users',
      icon: 'flowbite:user-solid',
      resourceId: 'adminuser'
    },
    {
      label: "Apartments",
      icon: "flowbite:user-solid",
      resourceId: "apartments",
      resourceId: "aparts",
    },
  ],
  ...
});
Generating fake appartments
async function seedDatabase() {
  if (await admin.resource('aparts').count() > 0) {
    return
  }
  for (let i = 0; i < 100; i++) {
    await admin.resource('aparts').create({
      id: `${i}`,
      title: `Apartment ${i}`,
      square_meter: Number((Math.random() * 100).toFixed(1)),
      price: (Math.random() * 10000).toFixed(2),
      number_of_rooms: Math.floor(Math.random() * 4) + 1,
      description: 'Next gen apartments',
      created_at: (new Date(Date.now() - Math.random() * 60 * 60 * 24 * 14 * 1000)).toISOString(),
      listed: i % 2 == 0,
      country: `${['US', 'DE', 'FR', 'GB', 'NL', 'IT', 'ES', 'DK', 'PL', 'UA'][Math.floor(Math.random() * 10)]}`
    });
  };
};

if (fileURLToPath(import.meta.url) === path.resolve(process.argv[1])) {

  ...

  admin.discoverDatabases().then(async () => {
    if (!await admin.resource('adminuser').get([Filters.EQ('email', 'adminforth')])) {
      await admin.resource('adminuser').create({
        email: 'adminforth',
        password_hash: await AdminForth.Utils.generatePasswordHash('adminforth'),
        role: 'superadmin',
      });
    }
    await seedDatabase();
  });
This will create records during first launch. Now you should see:
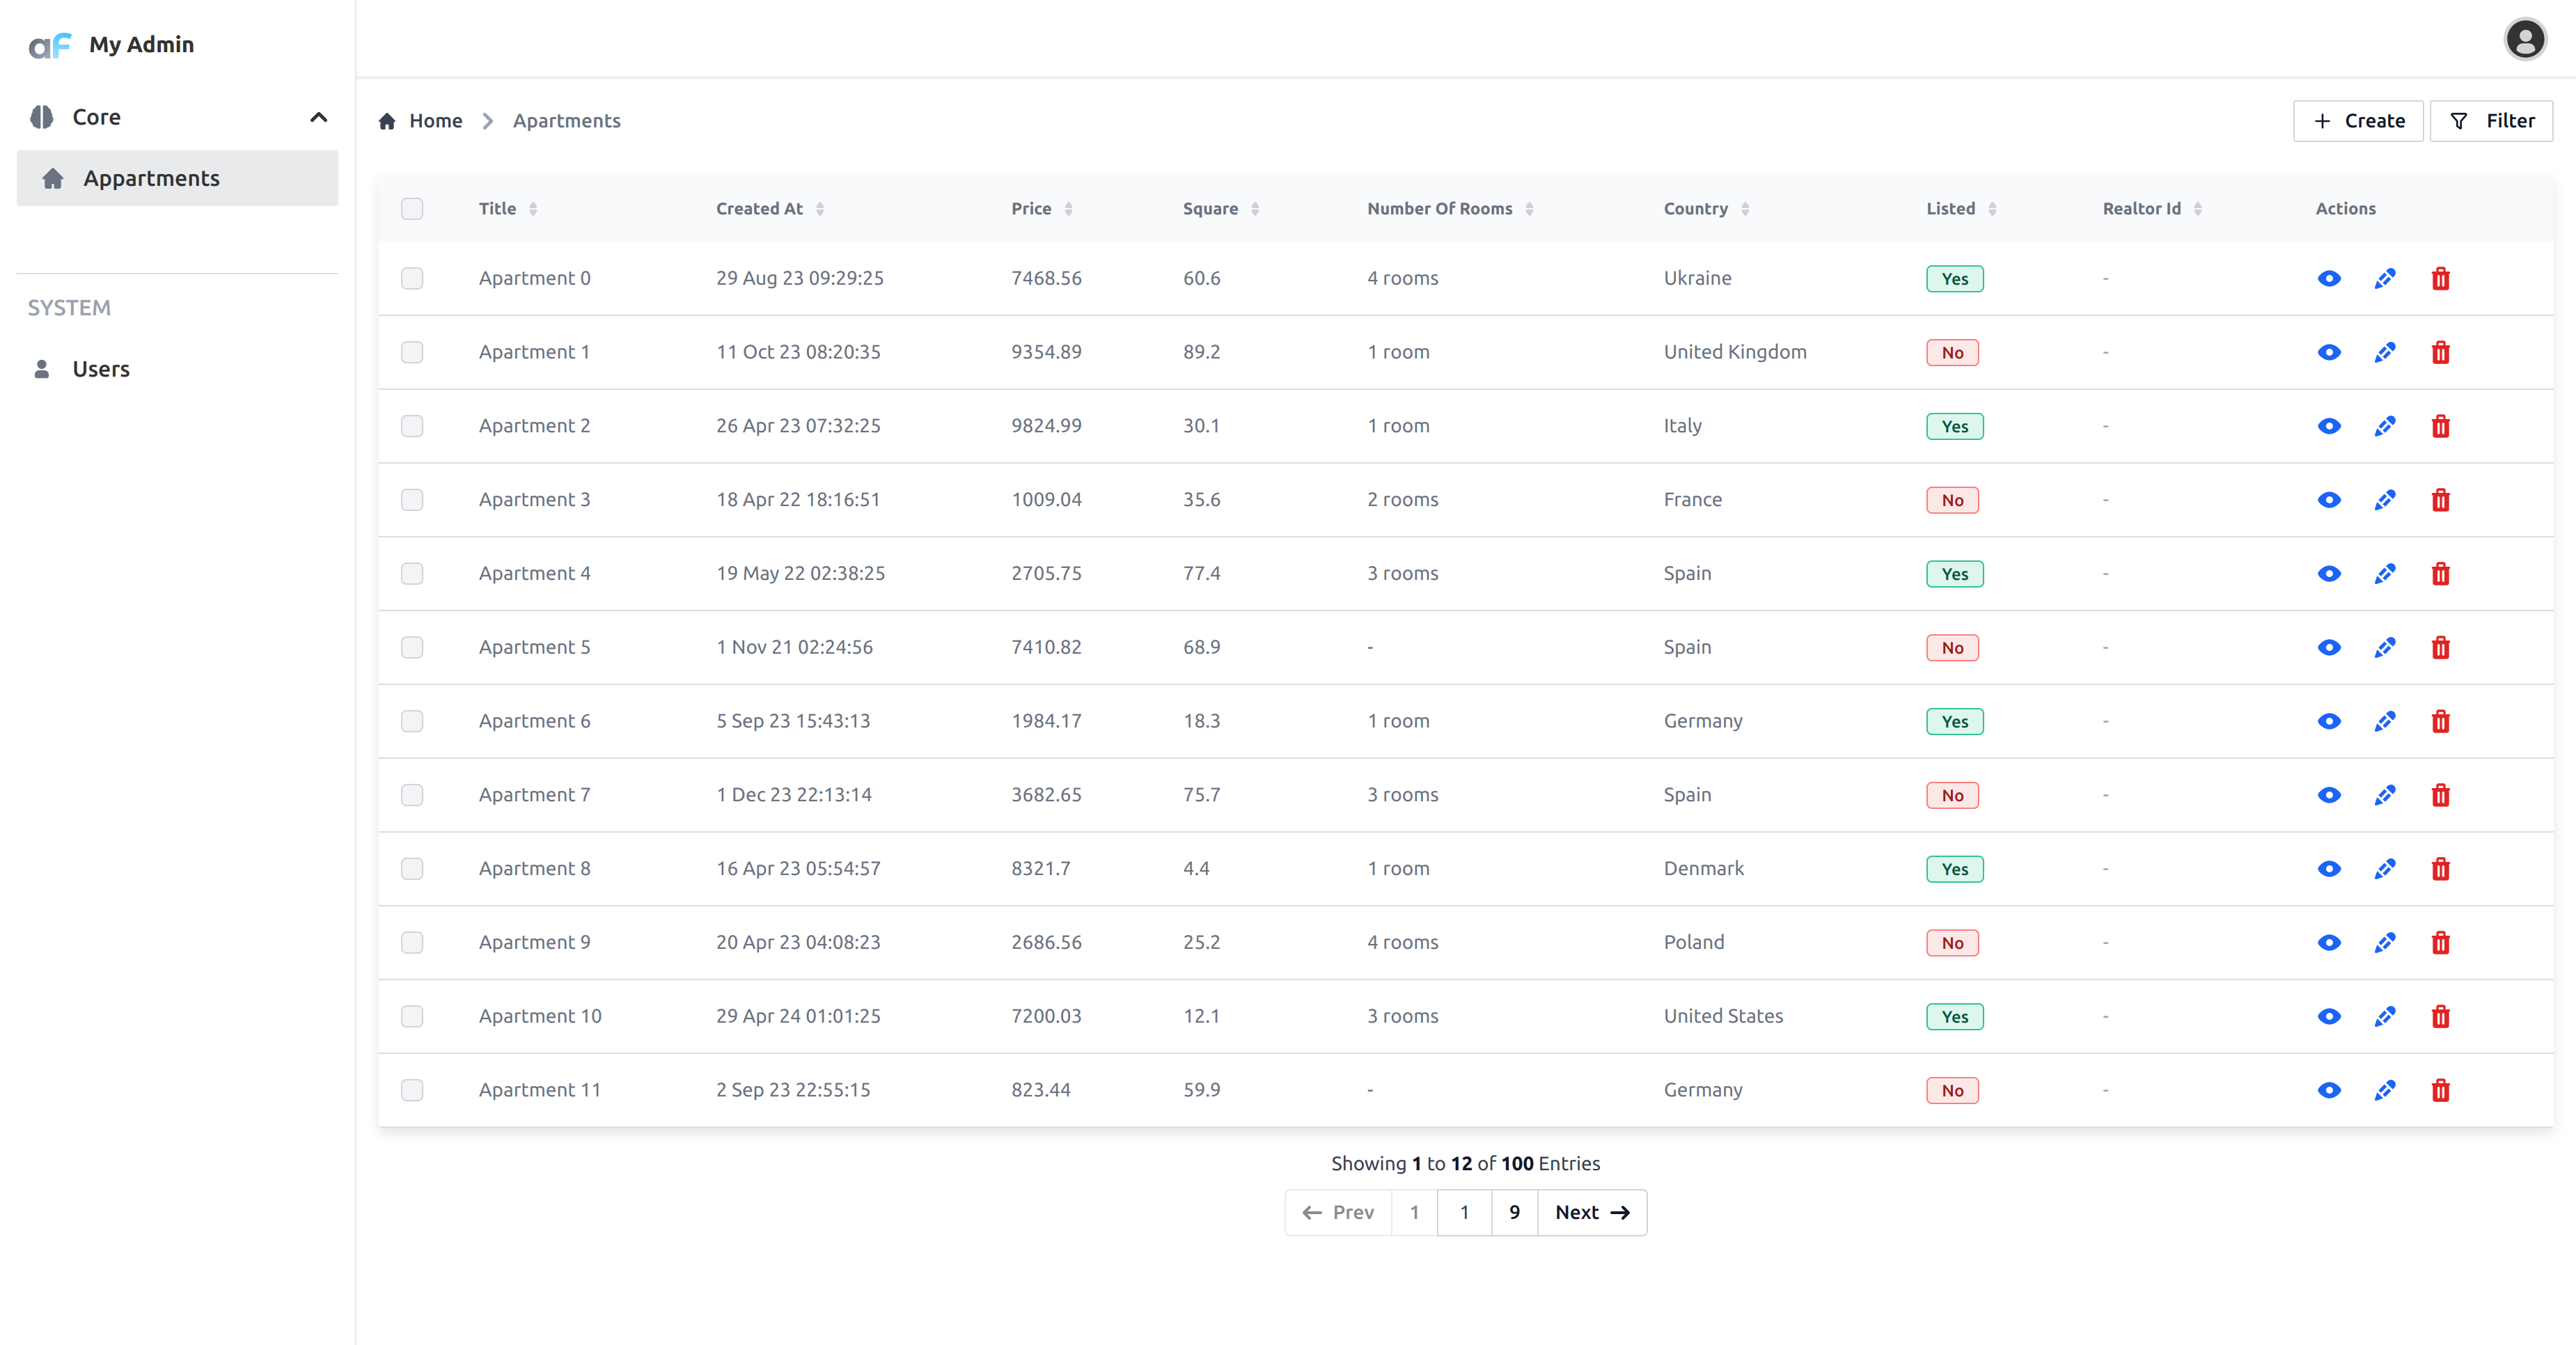
Feel free to play with the data, add more fields, and customize the UI to your liking.